

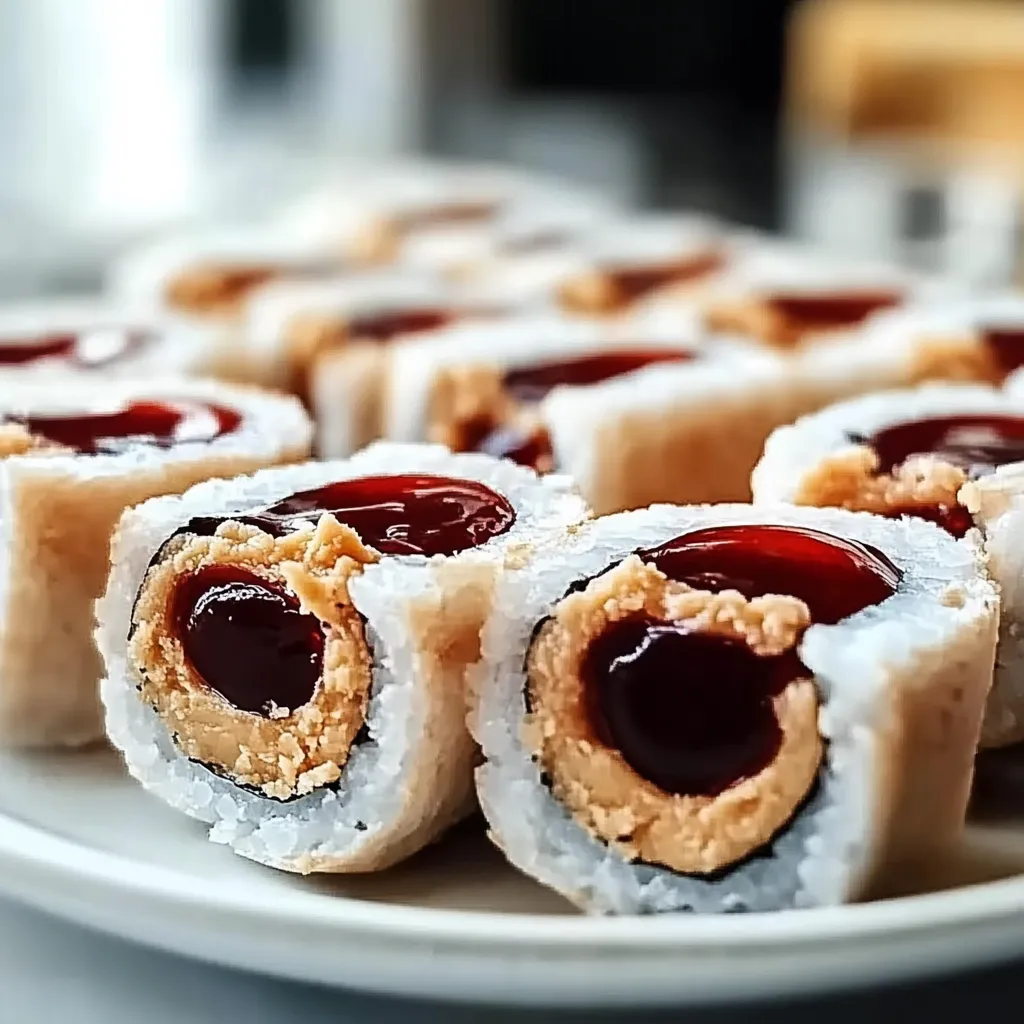
Hey there, food friends! Have you ever found yourself reminiscing about the good old days when lunchtime meant a classic peanut butter and jelly sandwich? I certainly do! Growing up, those sandwiches were my lunchtime hero—simple, sweet, and oh-so-satisfying. There’s just something magical about the creamy richness of peanut butter paired with the sweet, fruity burst of jelly. As a kid, I never imagined that a humble sandwich could be transformed into something a little more adventurous and playful. Enter: Peanut Butter and Jelly Sushi!
This delightful twist on a childhood favorite is not just for kids; it’s a fun, easy, and creative way to elevate that classic combo into something a bit more sophisticated. Whether you’re looking for a quick snack, a creative lunch idea, or a sweet dessert, PB&J sushi is here to steal the show! Let’s roll into this delicious adventure together!
Why You’ll Love This Recipe
- Super quick and easy to make—perfect for busy weeknights.
- Uses simple ingredients you probably already have at home.
- Fun to make with kids; they’ll love rolling their own sushi!
- Endless possibilities for variations: switch up the nut butter or jelly flavors.
- A creative snack or dessert that’s sure to impress friends and family.
Ingredients
Ready to whip up some PB&J sushi? Here’s what you’ll need:
- 4 slices of soft white bread (crusts removed for the best sushi vibes)
- ½ cup of creamy peanut butter (or your favorite nut butter)
- ½ cup of your favorite jelly or jam (strawberry, grape, or raspberry work great!)
- 1 banana, sliced (optional, but adds a lovely texture and flavor)
- Sprinkles or chopped nuts (for rolling, if desired)
Note: You can use whole wheat bread for a healthier version, and feel free to swap out the peanut butter for almond or cashew butter if you’re looking for a nut-free option!
Step-by-Step Instructions
Let’s get rolling! Follow these simple steps to create your Peanut Butter and Jelly Sushi:
- Flatten the bread: Take a slice of bread and gently use a rolling pin or your hands to flatten it. You want it nice and thin, but be careful not to tear it!
- Spread the peanut butter: Evenly spread about 2 tablespoons of peanut butter on the flattened bread, leaving a small border around the edges for easy rolling.
- Add the jelly: Next, spread about 2 tablespoons of jelly over the peanut butter. You can add more if you like it extra sweet, but be careful not to overdo it or the roll might get too messy!
- Add the banana: If you’re using banana, lay down a few slices on top of the jelly for a delightful touch of creaminess.
- Roll it up: Starting from one end, carefully begin to roll the bread tightly. Don’t be too forceful—gentle rolling keeps it all together beautifully!
- Slice: Once rolled, use a sharp knife to slice your sushi into bite-sized pieces—about 1 inch thick works perfectly!
- Decorate (optional): If you want to make it a bit extra special, you can roll the sushi in sprinkles or chopped nuts for a crunchy, colorful finish.
Personal Tip: If you find the bread tearing while rolling, try warming it up slightly in the microwave for about 10 seconds—it makes for a softer, more pliable bread!
Pro Tips & Variations
This recipe is super versatile, so don’t hesitate to get creative! Here are some fun twists:
- Nut Butters: Try this with almond butter, sunflower seed butter, or even a chocolate hazelnut spread for a decadent dessert version!
- Jelly Swaps: Mix things up with different jams like apricot, orange marmalade, or even a spiced apple butter.
- Add-ins: Consider adding thin slices of strawberries, raspberries, or even a sprinkle of granola for extra crunch and flavor!
- Chocolate Drizzle: For a dessert version, drizzle melted chocolate on the finished sushi for that extra “wow” factor.
This dish is such a great canvas for experimentation, so have fun with it!
Serving Suggestions
Now that you’ve brilliantly crafted your Peanut Butter and Jelly Sushi, how do you want to serve it? These sushi rolls are delightful on their own, but also pair beautifully with:
- A side of fresh fruit, like apple slices or berries.
- A glass of milk or a cozy cup of chai tea for a delicious afternoon treat.
- You can even serve them with yogurt for dipping—yummy!
Trust me, whatever you choose, it’s going to create a lovely, cozy vibe that’s quite irresistible!
Storage Tips
If you find yourself with leftovers (though I doubt that will happen), here’s how to keep the flavor fresh:
- Refrigerating: Store any remaining sushi in an airtight container in the fridge for up to 2 days. They may get a little less fresh, but they’ll still be tasty!
- Freezing: While I recommend enjoying these fresh, you can freeze them by wrapping individually in plastic wrap and placing them in a freezer-safe container. They’ll last up to a month! Just thaw them in the fridge before enjoying.
- Reheating: If you’ve frozen them and want to warm them up, pop them in the microwave for about 15 seconds until they’re soft but not hot—the goal is to keep that lovely texture!
FAQs
Can I use gluten-free bread for this recipe?
Absolutely! Gluten-free bread can work beautifully in this recipe. Just make sure to roll it gently to avoid any crumbling, and you’ll be set!
What other fillings can I add to the sushi?
The sky’s the limit! You can add shredded coconut, puffed rice, or even thin slices of cucumbers for a crunch. Get creative and make it your own!
Is this a good option for kids’ lunches?
Yes, indeed! Kids love the fun shape and flavors, plus you can easily customize it to their tastes. Just pack them in a container to keep them fresh until lunchtime.
How do I know if the bread is too stale to use?
If your bread feels hard or dry, it’s probably best to skip it for this recipe. Fresh, soft bread will roll beautifully and give you those perfect sushi bites!
Conclusion
And there you have it, my lovely kitchen pals! Your very own Peanut Butter and Jelly Sushi ready to be devoured. As you enjoy each delightful bite, I hope you’re reminded of the simple joys of childhood and the deliciousness of creativity in the kitchen. If you give this recipe a try, I would absolutely love to hear how it turned out! Feel free to leave a comment and share your imaginative ingredients and twists. Happy rolling!


Master Delightful PB&J Sushi: Easy Technique Revealed!
- Total Time: 10 minutes
- Yield: 2 servings 1x
Description
Discover the easy PB&J sushi method! Create delightful peanut butter and jelly sushi rolls that everyone will love. Perfect for kids and snacks!
Ingredients
Instructions
Notes
A fun and creative twist on the classic peanut butter and jelly sandwich, transformed into a delightful sushi roll perfect for all ages.
- Prep Time: 10 minutes
- Category: Snack
- Cuisine: American
Nutrition
- Serving Size: 2 servings
- Calories: 250
- Sugar: 10g
- Fat: 12g
- Carbohydrates: 30g
- Fiber: 3g
- Protein: 8g
Keywords: Peanut Butter, Jelly, Sushi, Snack, Recipe, Kid-Friendly


Leave a Comment