
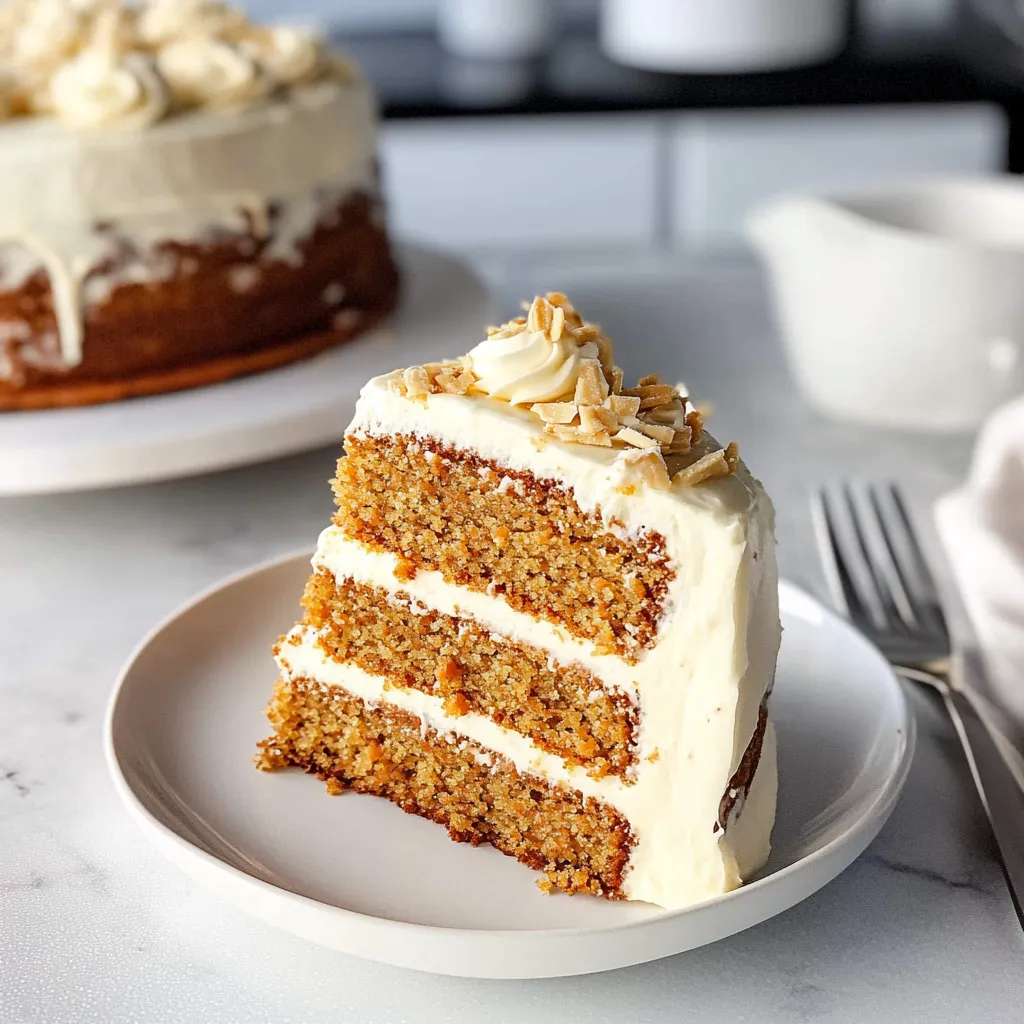
Ah, carrot cake! Just saying those two words brings back the sweetest memories of family gatherings and springtime celebrations. I remember the days when my grandma would whip up her famous carrot cake, filling the house with the warm, spiced aroma of cinnamon and nutmeg. The excitement in the kitchen was palpable as we all waited eagerly for that first slice. With its moist, tender crumb and luscious cream cheese frosting, carrot cake has a special place in my heart. Today, I’m thrilled to share with you my beloved Layer Cake Version of Carrot Cake, topped with the fluffiest cream cheese frosting you’ll ever taste!
Why You’ll Love This Recipe
- It’s perfect for any occasion—birthdays, holidays, or just because!
- The combination of warm spices and sweet carrots creates a comforting flavor profile.
- This recipe is forgiving; even if you’re new to baking, you’ll be able to make it!
- It’s a showstopper layer cake that looks impressive but is surprisingly manageable.
- The cream cheese frosting adds a tangy sweetness that complements the cake perfectly.
Ingredients
Before we start this delightful baking journey, gather the following ingredients:
- For the cake:
- 2 cups all-purpose flour
- 2 cups granulated sugar
- 1 tsp baking powder
- 1 tsp baking soda
- 1 tsp ground cinnamon
- ½ tsp ground nutmeg
- ½ tsp salt
- 1 cup vegetable oil (or melted coconut oil for a subtler flavor)
- 4 large eggs
- 3 cups grated carrots (about 5-6 medium carrots)
- 1 cup crushed pineapple, drained (for extra moisture!)
- 1 cup chopped walnuts or pecans (optional, but highly recommended)
- For the cream cheese frosting:
- 8 oz cream cheese, softened
- ½ cup unsalted butter, softened
- 4 cups powdered sugar
- 1 tsp vanilla extract
- 1-2 tbsp heavy cream (to reach desired consistency)
Tip: Using fresh carrots will give your cake a richer flavor compared to pre-packaged grated carrots. Don’t skip on grating them yourself!
Step-by-Step Instructions
Let’s get our hands a little dirty and bake this cake!
- Preheat your oven: Set it to 350°F (175°C). Grease and flour two 9-inch round cake pans. This helps to guarantee easy removal later. A good baker never forgets this step!
- Combine the dry ingredients: In a large bowl, whisk together the flour, sugar, baking powder, baking soda, cinnamon, nutmeg, and salt until well mixed. The smell of spices will start to fill your kitchen—nothing beats that!
- Mix the wet ingredients: In another bowl, whisk together the oil and eggs until combined. Then add in the grated carrots and crushed pineapple. Stir until well incorporated. (Can we just take a moment to appreciate how vibrant and colorful this mixture is?)
- Combine wet and dry ingredients: Gradually fold the wet ingredients into the dry ingredients. This is where you need to be careful; you want a little lumps in the batter but make sure everything is just combined. Don’t overmix, or you’ll end up with a dense cake.
- Add nuts: If you’re using walnuts or pecans, fold them in gently at this stage. They add a wonderful crunch and earthiness to the cake.
- Pour and bake: Divide the batter evenly between your prepared cake pans. Bake in your preheated oven for 25-30 minutes, or until a toothpick inserted in the center comes out clean. Your kitchen will smell like heaven right about now!
- Cool: Let the cakes cool in the pans for about 10 minutes, then turn them out onto wire racks to cool completely. This is the hardest part—waiting for them to cool down!
- While the cakes cool, make the frosting: In a mixing bowl, beat together the cream cheese and butter until smooth. Gradually add in the powdered sugar and beat until creamy. Pour in the vanilla extract and blend. If the frosting is too thick, splash in some heavy cream until you reach the perfect spreadable consistency.
- Layer the cake: Once your cakes are completely cool, place one layer on a cake stand or plate. Spread a generous amount of cream cheese frosting on top, then carefully place the second layer on top. Crumb-coat the whole cake with a thin layer of frosting to seal in any crumbs, and chill for about 30 minutes. This will help keep those pesky crumbs from ruining your top layer.
- Frost the cake: After chilling, cover the entire cake with the remaining frosting using an offset spatula or a butter knife. Get creative with swirls or even add some extra chopped nuts on top for garnish. If you’re feeling extra fancy, you can press coconut flakes around the sides!
Pro Tips & Variations
Now that we’ve got the basics down, let’s play around a bit!
- Spices: Feel free to experiment by adding cloves or ginger for a little kick!
- Sweetness: If you like things a bit sweeter, drenching the layers in a light vanilla syrup can be delightful.
- Diet swaps: You can substitute applesauce for some of the oil to make a lower-fat version. You won’t lose that moisture!
- Mix-ins: Add raisins or cranberries for a surprising fruity punch.
Serving Suggestions
Ah, the joy of serving this cake! I love to slice into it when it’s just the right temperature—sweet, creamy, and utterly sumptuous. It’s delightful on its own, but pairing it with a steaming cup of coffee or a cozy herbal tea makes for a perfect afternoon treat. For a festive touch, feel free to serve it with a scoop of vanilla ice cream or a dollop of whipped cream, especially in those warmer months. Imagine this glorious cake as the centerpiece of your table; it’s sure to bring smiles and satisfied sighs!

Storage Tips
Wondering how to keep this beauty fresh? Here’s how!
- Refrigerate: Cover the frosted cake with plastic wrap or a cake dome and store it in the refrigerator. It will last for about 5-7 days—if you can resist it that long!
- Freeze: You can also freeze sliced pieces of cake. Just wrap them tightly in plastic wrap, then aluminum foil, and store them in an airtight container. It should keep well for up to 3 months. To defrost, just leave it in the fridge overnight or let it sit at room temperature for a couple of hours.
- Reheat: Although it’s best served cold, a quick 10-15 seconds in the microwave brings out the flavors if you’re in the mood for a warm slice!
FAQs
Can I make this cake gluten-free?
Absolutely! Just swap out the all-purpose flour for a gluten-free 1:1 baking flour. Make sure it contains xanthan gum for the best texture.
How can I reduce the sugar in this recipe?
You can try reducing the amount of sugar by up to a third without losing too much flavor. Alternatively, use a sugar substitute that measures cup-for-cup!
What’s the best way to grate carrots for the cake?
A box grater works well, or if you have a food processor, that can make quick work of shredding those carrots evenly. Just make sure they’re not too finely grated; you want them to maintain some texture in the cake!
I don’t like nuts. Can I skip them?
Of course! This cake is just as delicious without the nuts, but do consider adding in some raisins or extra spices for that flavor boost!
Conclusion
I hope you enjoy each step of making this Carrot Cake – Layer Cake Version with Cream Cheese Frosting as much as I do. It’s such a joy to share recipes that carry so much love and nostalgia. Please let me know how it turns out for you or if you have any twists of your own! I love hearing from you and can’t wait to see you in the kitchen again for our next delicious adventure. Happy baking!
Print
Decadent Carrot Layer Cake with Cream Cheese Frosting Delight
- Total Time: 1 hour
- Yield: 12 servings 1x
Description
Indulge in a layered carrot cake with rich cream cheese frosting. Perfect for celebrations, this delicious dessert will impress every guest. Enjoy!
Ingredients
Instructions
Notes
A delightful Layer Cake Version of Carrot Cake topped with creamy and fluffy cream cheese frosting, perfect for any occasion.
- Prep Time: 30 minutes
- Cook Time: 30 minutes
- Category: Dessert
- Cuisine: American
Nutrition
- Serving Size: 12 servings
- Calories: 450
- Sugar: 40g
- Fat: 22g
- Carbohydrates: 63g
- Fiber: 1g
- Protein: 4g
Keywords: carrot cake, layer cake, cream cheese frosting, dessert recipe, baking


Leave a Comment