
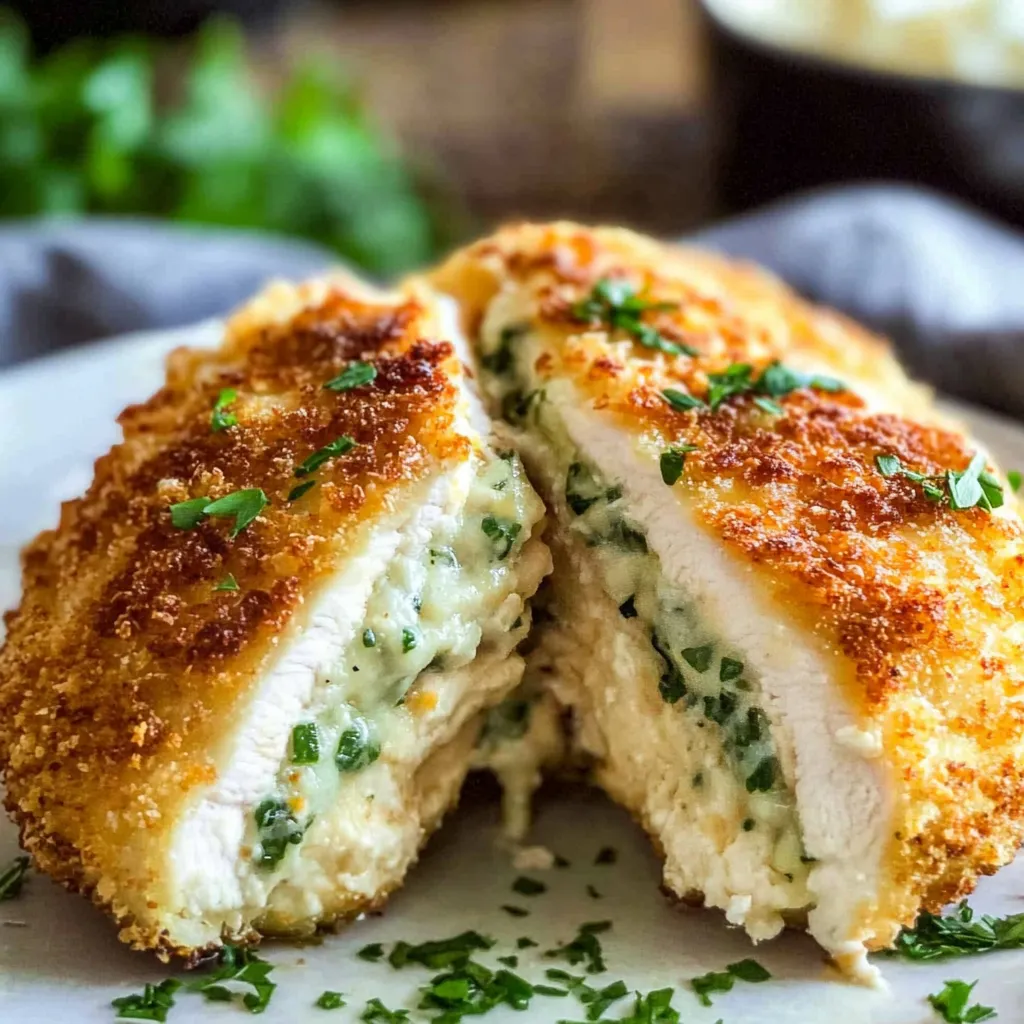
There are some dishes that just take me back to my childhood, and Chicken Kiev is at the top of that list. I remember helping my mom in the kitchen as she taught me how to prepare this delightful meal – crunchy on the outside, filled with a flavorful garlicky butter that would ooze out with every bite. It’s one of those recipes that feels like a warm hug, especially on a cozy Sunday evening. Now, whenever I make Chicken Kiev, I can’t help but smile and think of those sweet moments spent cooking alongside her.
This Chicken Kiev recipe is perfect for impressing dinner guests or simply treating yourself on a weeknight. It’s surprisingly easy to make, and I promise you, the first time you cut into those crispy chicken breasts, and the melted garlic herb butter spills out, it will truly be magical!
Why You’ll Love This Recipe
- Incredibly flavorful and juicy chicken.
- Easy to prepare, even for beginner cooks.
- Perfect comforting dish for any occasion.
- Can be made ahead of time and frozen for later.
- Customizable with different herbs and spices!
Ingredients
Here’s what you’ll need to create this culinary masterpiece:
- 4 boneless, skinless chicken breasts (about 6 oz each)
- 1 cup all-purpose flour
- 2 large eggs
- 2 cups breadcrumbs (panko works great for extra crunch!)
- 1/2 cup unsalted butter, softened
- 3-4 cloves garlic, minced (fresh garlic adds more punch than powdered!)
- 2 tablespoons fresh parsley, chopped
- 1 tablespoon fresh dill, chopped (or your favorite herb)
- Salt and pepper to taste
- Cooking oil (for frying)
Step-by-Step Instructions
Let’s get cooking! Trust me; it’ll be worth it.
- Prepare the herb butter: In a bowl, mix the softened butter, minced garlic, parsley, dill, salt, and pepper. You want it to be well combined but still have some chunks of herbs for texture. Don’t be shy; taste it and adjust the seasoning!
- Shape the chicken: Place the chicken breasts between two sheets of plastic wrap and gently pound them to about 1/2 inch thickness. This way, they’ll cook evenly and be extra tender. Just make sure not to smash them into oblivion!
- Fill the chicken: Take a generous spoonful of your garlic herb butter and place it in the center of each chicken breast. Fold the sides over the butter, then roll it up tightly like a burrito, tucking in the ends. Secure with toothpicks to prevent any butter from escaping! (Don’t worry; we’ll remove them before serving)
- Coat the chicken: Set up an assembly line – one dish for flour, one for beaten eggs, and one for breadcrumbs. First, dredge each chicken roll in flour, shaking off any excess. Next, dip it in the egg mixture, and finally coat it in breadcrumbs, pressing gently to ensure it sticks.
- Chill: Place the prepared chicken rolls on a baking sheet and refrigerate for at least 30 minutes. This helps them hold their shape while cooking and gives the coating a chance to set.
- Fry the chicken: In a large skillet, heat about an inch of cooking oil over medium heat. Test the oil with a breadcrumb – it should sizzle when it’s ready. Carefully add the chicken rolls, cooking in batches if needed. Fry for about 5-6 minutes on each side until golden brown and cooked through.
- Rest and serve: Once cooked, place the chicken on a paper towel-lined plate to drain excess oil for a minute. Remove toothpicks, then serve immediately for that perfect, gooey butter moment!

Pro Tips & Variations
Let’s chat about some fun ways to mix things up!
- Herb Mix: Feel free to get creative with your herbs! Basil, thyme, or even a bit of oregano can give it a fresh twist.
- Spicy Kick: Add a pinch of red pepper flakes to the butter for a little heat. It’s unexpected and delicious!
- Cheesy Goodness: You can even mix in some grated Parmesan cheese into the herb butter for an extra punch of flavor.
- Oven-Baked: If you prefer baking over frying, preheat your oven to 400°F (200°C) and bake the chicken for about 25-30 minutes until cooked through and crispy.
Serving Suggestions
This Chicken Kiev pairs beautifully with just about everything!
- Accompaniments: Try serving it alongside a light salad, buttery mashed potatoes, or fluffy rice to soak up any leftover garlic butter.
- Drinks: For a lovely finish, a crisp white wine or a refreshing iced tea will complement the flavors perfectly.

Storage Tips
If you have leftovers (but let’s be honest, they’ll be hard to come by), here’s how to keep them tasty:
- Refrigeration: Store cooled Chicken Kiev in an airtight container in the fridge for up to 3 days. When reheating, a quick blast in the oven will help keep it crispy!
- Freezing: You can freeze them before or after cooking! If freezing before cooking, wrap each piece tightly in plastic wrap and then in foil. They’ll last about 2-3 months. Just pull them out a few hours before cooking to thaw.
- Reheat: If frozen, bake them directly from frozen at 375°F (190°C) for about 40-50 minutes or until heated through. Golden and gooey is the ultimate goal!
FAQs
Can I use chicken thighs instead of breasts?
Absolutely! Chicken thighs are a great option if you prefer dark meat – they’re juicy and packed with flavor. Just adjust the cooking time accordingly, as they may take a bit longer to cook through.
Can I make Chicken Kiev ahead of time?
You bet! You can prepare the chicken rolls and store them in the fridge for up to a day before frying. This makes them perfect for hosting or a busy weeknight meal.
What can I do if the butter leaks out during cooking?
Diving into that buttery goodness is part of the experience! However, if it leaks out, it can happen if the chicken wasn’t rolled tightly. Keep the temperature moderate to ensure it cooks through while crisping the coating – also helps keep the butter inside. Next time, just make sure those rolls are tightly secured!
Do I have to fry the chicken?
Nope! If you’re aiming for a healthier version, baking is a fantastic alternative. The key is to spray them with a little cooking spray to help achieve that golden color and crispy texture.
Conclusion
Chicken Kiev is more than just a dish; it’s an experience filled with flavor, warmth, and memories. I hope this recipe brings as much joy to your table as it does to mine! I’d absolutely love to hear how your Chicken Kiev turned out, so feel free to drop a comment or share your twist on this classic. Happy cooking, my friend!
Print
Ultimate Chicken Kiev Recipe: Easy & Delicious Guide!
- Total Time: 1 hour 5 minutes
- Yield: 4 servings 1x
Description
Master the Chicken Kiev recipe with this easy, delish guide. Enjoy the perfect crispy exterior and flavorful buttery filling. Cook like a pro today!
Ingredients
Instructions
Notes
A delightful Chicken Kiev recipe that combines crunchy chicken with flavorful garlicky butter, perfect for impressing dinner guests or enjoying a cozy meal at home.
- Prep Time: 30 minutes
- Cook Time: 35 minutes
- Category: Main Course
- Cuisine: Ukrainian
Nutrition
- Serving Size: 4 servings
- Calories: 500 calories
- Sugar: 1 gram
- Fat: 35 grams
- Carbohydrates: 20 grams
- Fiber: 2 grams
- Protein: 30 grams
Keywords: Chicken Kiev, recipe, Ukrainian cuisine, comfort food, easy recipe


Leave a Comment