
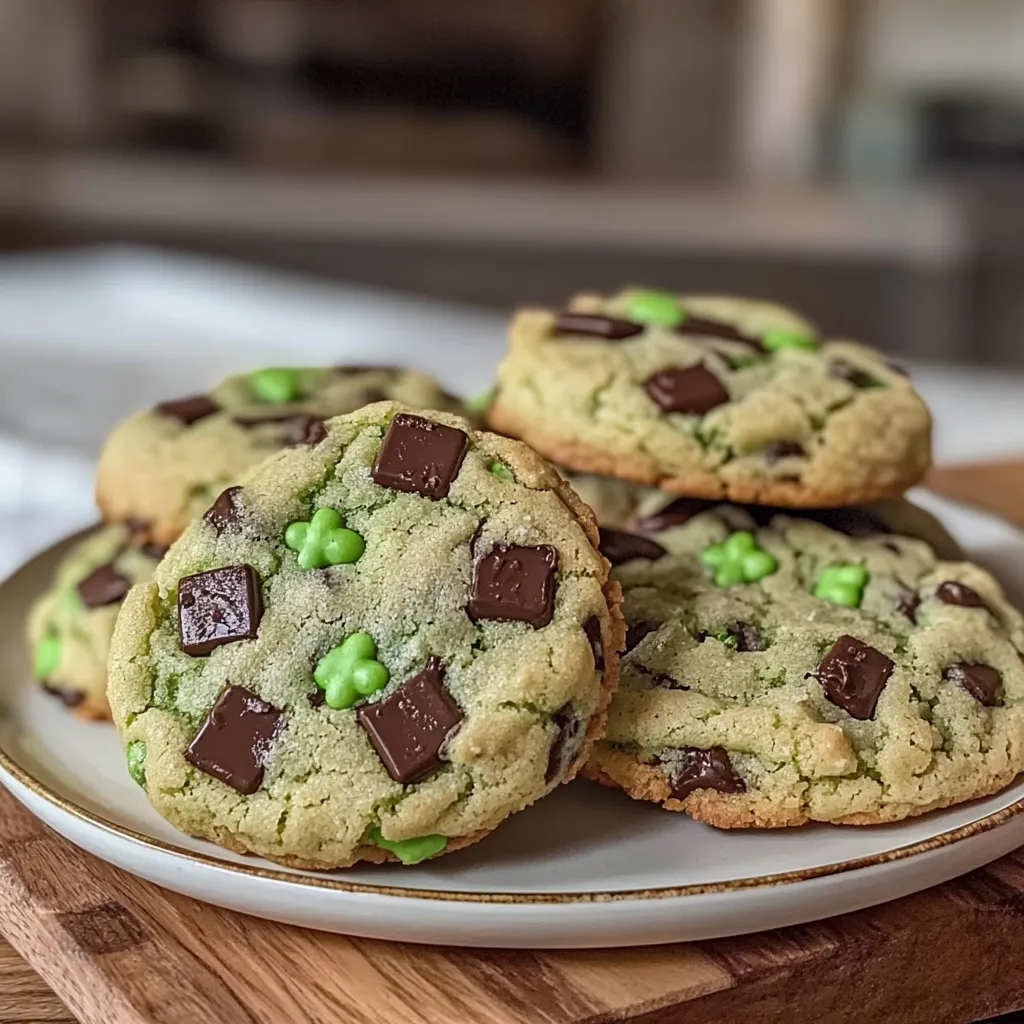
Ah, St. Patrick’s Day! It’s that delightful time of year when everything turns a vibrant shade of green, shamrocks pop up on every mantelpiece, and the air is filled with the sweet, minty aroma of cookies baking in the oven. Growing up, my family would gather in the kitchen to whip up our favorite holiday treats, basking in the warmth of togetherness and the promise of sweet indulgence. One of our staples? These Irresistible Shamrock Mint Chocolate Chip Cookies, of course! Light, crispy on the outside, chewy on the inside, and just the right amount of minty, these cookies never fail to lift spirits and spread a little cheer.
If you’re ready to bring a taste of the Emerald Isle to your kitchen this St. Patrick’s Day, look no further. Let’s roll up our sleeves and get baking!
Why You’ll Love This Recipe
- Super easy to make with simple ingredients.
- Minty fresh flavor that screams ‘St. Patrick’s Day.’
- Crispy edges with a chewy center – the perfect cookie texture!
- A hit with kids and adults alike – no one can resist.
- Perfect for sharing at parties or enjoying at home.
Ingredients
Here’s what you’ll need to gather to create these mouthwatering cookies:
- 1 cup unsalted butter, softened
- 1 cup brown sugar, packed
- ½ cup granulated sugar
- 2 large eggs
- 1 teaspoon pure vanilla extract
- 1 teaspoon peppermint extract (or more for a stronger mint flavor)
- 2 cups all-purpose flour
- ½ teaspoon baking soda
- ¼ teaspoon salt
- 1 ½ cups chocolate chips (dark or semi-sweet)
- Green food coloring (optional for that festive touch!)
Notes: Make sure your butter is softened to room temperature for easier mixing. And trust me, fresh mint extracts make a real difference in flavor!
Step-by-Step Instructions
Now, let’s bring everything together. Follow these simple steps, and soon you’ll have a batch of cookies that will make your kitchen smell heavenly.
- Preheat your oven: Set it to 350°F (175°C). This is the perfect temperature for baking those cookies to delicious perfection.
- Cream the butters and sugars: In a large mixing bowl, beat together the softened butter, brown sugar, and granulated sugar using an electric mixer until it’s light and fluffy. This usually takes about 3-4 minutes. Make sure you scrape down the sides of the bowl for even mixing.
- Add eggs and extracts: Crack in the eggs, and add the vanilla and peppermint extracts. Mix until everything is combined again. Get ready for that heavenly aroma!
- Mix the dry ingredients: In another bowl, whisk together the flour, baking soda, and salt. Gradually add this mixture to the wet ingredients, mixing just until combined. Be careful not to overmix, or your cookies might turn out tough!
- Add the chocolate chips: Fold in the chocolate chips with a spatula, and if you’re feeling festive, add a few drops of green food coloring until you reach your desired shade of green. It’s totally optional, but those little green flecks are just so fun!
- Shape your cookies: Using a tablespoon or cookie scoop, drop rounded balls of cookie dough onto a parchment-lined baking sheet, leaving about 2 inches between each one.
- Bake: Pop them in the oven and bake for about 10-12 minutes, until the edges are lightly golden and the centers still look a little soft. Don’t worry, they’ll set as they cool!
- Cool and enjoy: Let the cookies cool on the baking sheet for a few minutes before transferring them to a wire rack to cool completely (if you can resist eating them warm!).
Pro Tips & Variations
Want to personalize your cookies or try something new? Here are some playful ideas:
- Add nuts: Chopped walnuts or pecans can add a lovely crunch.
- Minty chocolate drizzle: Melt some extra chocolate chips and drizzle over the cooled cookies for an extra chocolatey touch.
- Swap out the chocolate: Try using white chocolate chips for a sweeter take, or even mix in some crushed Oreo cookies for a different texture.
- Make it gluten-free: Substitute the all-purpose flour with a 1:1 gluten-free flour blend.
The key is to experiment and have fun! Baking should be a joyful and creative process.

Serving Suggestions
These cookies are perfect on their own, but why not add a little flair? Here’s how I love to serve them:
- Pair them with a warm cup of mint tea or coffee for an afternoon treat.
- Use them as a dessert centerpiece on a festive St. Patrick’s Day platter – mix with other green treats like shamrock-shaped brownies.
- Bring a batch to a gathering and watch as they disappear in minutes!
Imagine the delight when everyone takes a bite of that warm, minty goodness! It’s pure happiness on a plate.
Storage Tips
After all that baking, you might find yourself with some leftover cookies (although, let’s be real—they rarely last long!). Here’s how to store them:
- Room temperature: Store your cookies in an airtight container at room temperature for up to a week. This helps maintain their soft and chewy texture.
- Refrigerate: If you want them to last a bit longer, you can refrigerate them for up to two weeks.
- Freeze: To freeze, place cookies in a single layer on a baking sheet until frozen. Then, transfer them to a freezer-safe container or bag. They’ll last up to three months! Just let them thaw at room temperature when you crave a cookie.
A little tip I’ve learned over the years – when reheating, pop them in the microwave for just 10 seconds to regain that freshly-baked warmth!
FAQs
Can I make the dough ahead of time?
Absolutely! You can prepare the dough ahead of time, wrap it tightly in plastic wrap, and refrigerate for up to 48 hours. When you’re ready to bake, simply scoop and bake as directed! If you want to make it even further in advance, you can freeze the dough for later use.
What if I don’t have peppermint extract?
No worries! You can use an equal amount of vanilla extract for a delicious, albeit different, flavor. If you’re feeling adventurous, you might try a splash of almond extract instead!
Why did my cookies come out flat?
Flat cookies can happen for a couple of reasons: make sure your butter is softened and not melted, and ensure you’re measuring your flour correctly. Spoon the flour into your measuring cup and level it off with a knife for the most accurate measurement.
Can I double the recipe?
You can definitely double this recipe! Just keep in mind that you may need to bake them in batches, depending on the size of your baking sheets and oven capacity.
Conclusion
And there you have it – a delightful batch of Irresistible Shamrock Mint Chocolate Chip Cookies to celebrate St. Patrick’s Day! I hope this recipe fills your kitchen with warmth, laughter, and the sweet scent of success. Baking is all about love, and each cookie is a little piece of that joy, perfect for sharing with friends or savoring solo with a cozy cup of tea.
I’d love to hear how your cookies turned out, so feel free to drop a comment below or share your own twists on this classic recipe. Happy baking, and may your St. Patrick’s Day be filled with sweetness and a sprinkle of luck!
Print
Irresistible Mint Chocolate Chip Cookies: Easy St. Patrick’s Recipe
- Total Time: 27 minutes
- Yield: 24 cookies 1x
Description
Bake easy homemade shamrock mint chocolate chip cookies for St. Patrick’s Day! These irresistible treats are perfect for festive celebrations!
Ingredients
Instructions
Notes
Celebrate St. Patrick’s Day with these delightful Shamrock Mint Chocolate Chip Cookies, featuring a minty flavor and chewy texture that will bring joy to any gathering.
- Prep Time: 15 minutes
- Cook Time: 12 minutes
- Category: Dessert
- Cuisine: Irish
Nutrition
- Serving Size: 24 cookies
- Calories: 150
- Sugar: 10g
- Fat: 7g
- Carbohydrates: 21g
- Fiber: 1g
- Protein: 2g
Keywords: St. Patrick’s Day, cookies, mint chocolate chip, dessert, homemade


Leave a Comment