

There’s something truly magical about a lazy Sunday morning, don’t you think? The sun gently peeks through the curtains, and the world outside hums softly with the promise of a new day. On mornings like these, I often find myself craving a breakfast that feels a bit special, a bit indulgent—like these delightful Red Velvet Waffles with Creamy Glaze! They whisk me away to cozy brunch spots full of laughter and warmth. Just the aroma of rich cocoa and vanilla wafting through the kitchen is enough to put a smile on anyone’s face!
As I whip up this recipe, I can’t help but think back to the first time I tried red velvet anything. It was at a friend’s birthday brunch, and those fluffy red delights were a delightful surprise. Now, I love to share my version of this classic, transforming it into scrumptious waffles that are sure to impress your family or friends. If you’re ready for a breakfast that tastes as good as it looks, let’s dive into my Red Velvet Waffles Recipe with Creamy Glaze!
Why You’ll Love This Recipe
- Fluffy, delicious waffles that are perfect for breakfast or brunch.
- A beautiful red velvet twist that’s as fun to eat as it is to serve.
- The creamy glaze adds a sweet finish that takes these waffles over the top.
- Easy to whip up, making it a fantastic option for mornings when you want to impress!
- Tip: They’re great for special occasions like Valentine’s Day or anniversaries.
Ingredients
Let’s gather all the delicious ingredients for our Red Velvet Waffles. Here’s what you’ll need:
- 1 ¾ cups all-purpose flour
- ¼ cup unsweetened cocoa powder (dark cocoa gives a richer flavor!)
- 2 tablespoons sugar
- 1 tablespoon baking powder
- ½ teaspoon baking soda
- ½ teaspoon salt
- 1 ½ cups buttermilk (homemade or store-bought works wonderfully)
- 2 large eggs
- ½ cup vegetable oil (for buttery flavor, melted butter can also be used)
- 1 teaspoon vanilla extract
- 1 tablespoon red food coloring (or more for a deeper red—your call!)
For the creamy glaze:
- 1 cup powdered sugar
- 2 tablespoons cream cheese, softened
- 2-3 tablespoons milk (more if you like it thinner)
- ½ teaspoon vanilla extract
Pro Tip: Use fresh ingredients! Fresh buttermilk and good quality vanilla will make a noticeable difference in flavor.
Step-by-Step Instructions
Now that we have our ingredients ready, let’s get cooking! Follow these steps for a batch of delicious Red Velvet Waffles:
- Preheat your waffle iron! While it’s heating, this gives our waffles that perfect crispy outer layer.
- Whisk the dry ingredients. In a large bowl, mix together flour, cocoa powder, sugar, baking powder, baking soda, and salt. Make sure no lumps remain—this will get us closer to fluffy waffles!
- Mix the wet ingredients. In another bowl, whisk together buttermilk, eggs, vegetable oil, vanilla extract, and red food coloring until fully combined. The vibrant color is just gorgeous!
- Combine the wet and dry ingredients. Slowly pour the wet mixture into the dry ingredients and gently fold together. Here’s a golden rule—don’t overmix! It’s okay if there are a few small lumps; this will help keep the waffles light and airy.
- Grease the waffle iron. A spritz of non-stick cooking spray or melted butter works wonders—no one wants a waffle tragedy!
- Cook the waffles! Pour appropriate amounts of the batter into the preheated waffle iron—about ½ cup is usually perfect, but check your model’s instructions! Close the lid and cook until the waffles are golden brown, usually about 4-5 minutes.
- Keep warm. If you’re making multiple batches, keep your waffles warm in a low oven (around 200°F), until you’re ready to serve.
- Make the creamy glaze. In a medium bowl, mix powdered sugar, softened cream cheese, milk, and vanilla extract until smooth. Adjust the milk to reach your desired consistency—a drizzle that’s not too runny is perfection!
And voilà! You have your beautiful red velvet waffles ready to be enjoyed!

Pro Tips & Variations
Want to switch things up? Here are a few playful ideas:
- Add spices: A pinch of cinnamon or nutmeg can add a lovely warmth.
- Mix-ins: Toss in some chocolate chips or nuts for an added crunch.
- Healthy swaps: Substitute whole wheat flour for a healthier option, or use almond milk for a dairy-free version.
- Toppings: Top your waffles with fresh berries, whipped cream, or a sprinkle of chopped nuts to make your plate pop!
Serving Suggestions
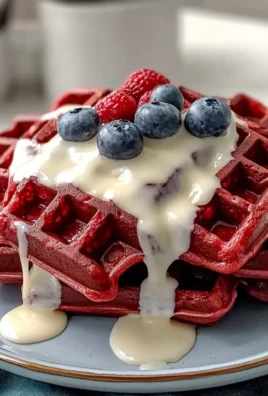
When it comes to serving these Red Velvet Waffles, welcome to a world of options! I like to plate them up with a drizzle of creamy glaze and perhaps a handful of fresh strawberries or raspberries on the side for that bright color contrast. A dollop of whipped cream doesn’t hurt either!
Pairing these waffles with a steaming cup of coffee or a refreshing glass of orange juice makes for a delightful start to your day. And if you’re feeling particularly fancy, why not add a side of crispy bacon or sausage? The sweet and savory combination is just divine!

Storage Tips
Let’s talk about how to keep these beauties fresh! If you find yourself with leftover waffles (which rarely happens!), you can stack them with parchment paper between each layer to prevent sticking. Store them in an airtight container in the fridge for up to 3 days.
If you want to keep them longer, freeze individual waffles in an airtight container or freezer bag. Just make sure to separate them with parchment paper to ensure they don’t clump together. When you’re ready to enjoy them, simply pop them in the toaster or oven until warmed through. You’ll be left with fluffy, delightful waffles that taste just as good as fresh!
FAQs
Can I make the batter ahead of time?
Yes! You can prepare the batter the night before and refrigerate it. Just give it a nice stir before pouring it into your waffle iron, as it may thicken up in the fridge.
Can I use gluten-free flour?
Absolutely! Just make sure to choose a high-quality gluten-free baking mix that’s meant for pancakes or waffles, and your red velvet dreams can still come true.
What’s the best way to reheat leftover waffles?
The toaster or oven works best! Pop them in at a low heat to keep them crispy, or for a quick fix, use the microwave wrapped in a paper towel for about 20-30 seconds, but be aware they may lose a bit of their crunch.
Do I have to use food coloring?
Not at all! While the food coloring gives the waffles their signature red hue, you can skip it and still enjoy the delicious flavor without it. They will be more of a chocolatey brown, but still oh-so-tasty!
Conclusion
I hope this Red Velvet Waffles Recipe with Creamy Glaze delights your mornings just as much as it does mine. It’s a little piece of joy to start the day with, and I can’t wait to hear how yours turn out! Please leave a comment and share your thoughts, along with any of your own creative twists on this recipe. Happy cooking, and remember, every morning can be special when you start it off with something sweet!
Print
Delicious Red Velvet Waffles Recipe Creamy Glaze for Mornings
- Total Time: 35 minutes
- Yield: 4 servings 1x
Description
Indulge in Red Velvet Waffles topped with a creamy glaze perfect for a sweet morning treat that will delight your taste buds Enjoy this easy recipe
Ingredients
Instructions
Notes
Indulge in delightful Red Velvet Waffles with a creamy glaze that adds the perfect touch for a sweet morning breakfast or brunch. Easy to prepare and perfect for special occasions.
- Prep Time: 15 minutes
- Cook Time: 20 minutes
- Category: Breakfast
- Cuisine: American
Nutrition
- Serving Size: 4 servings
- Calories: 450
- Sugar: 25g
- Fat: 20g
- Carbohydrates: 64g
- Fiber: 2g
- Protein: 8g
Keywords: Red Velvet Waffles, Waffles Recipe, Breakfast, Creamy Glaze


Leave a Comment