
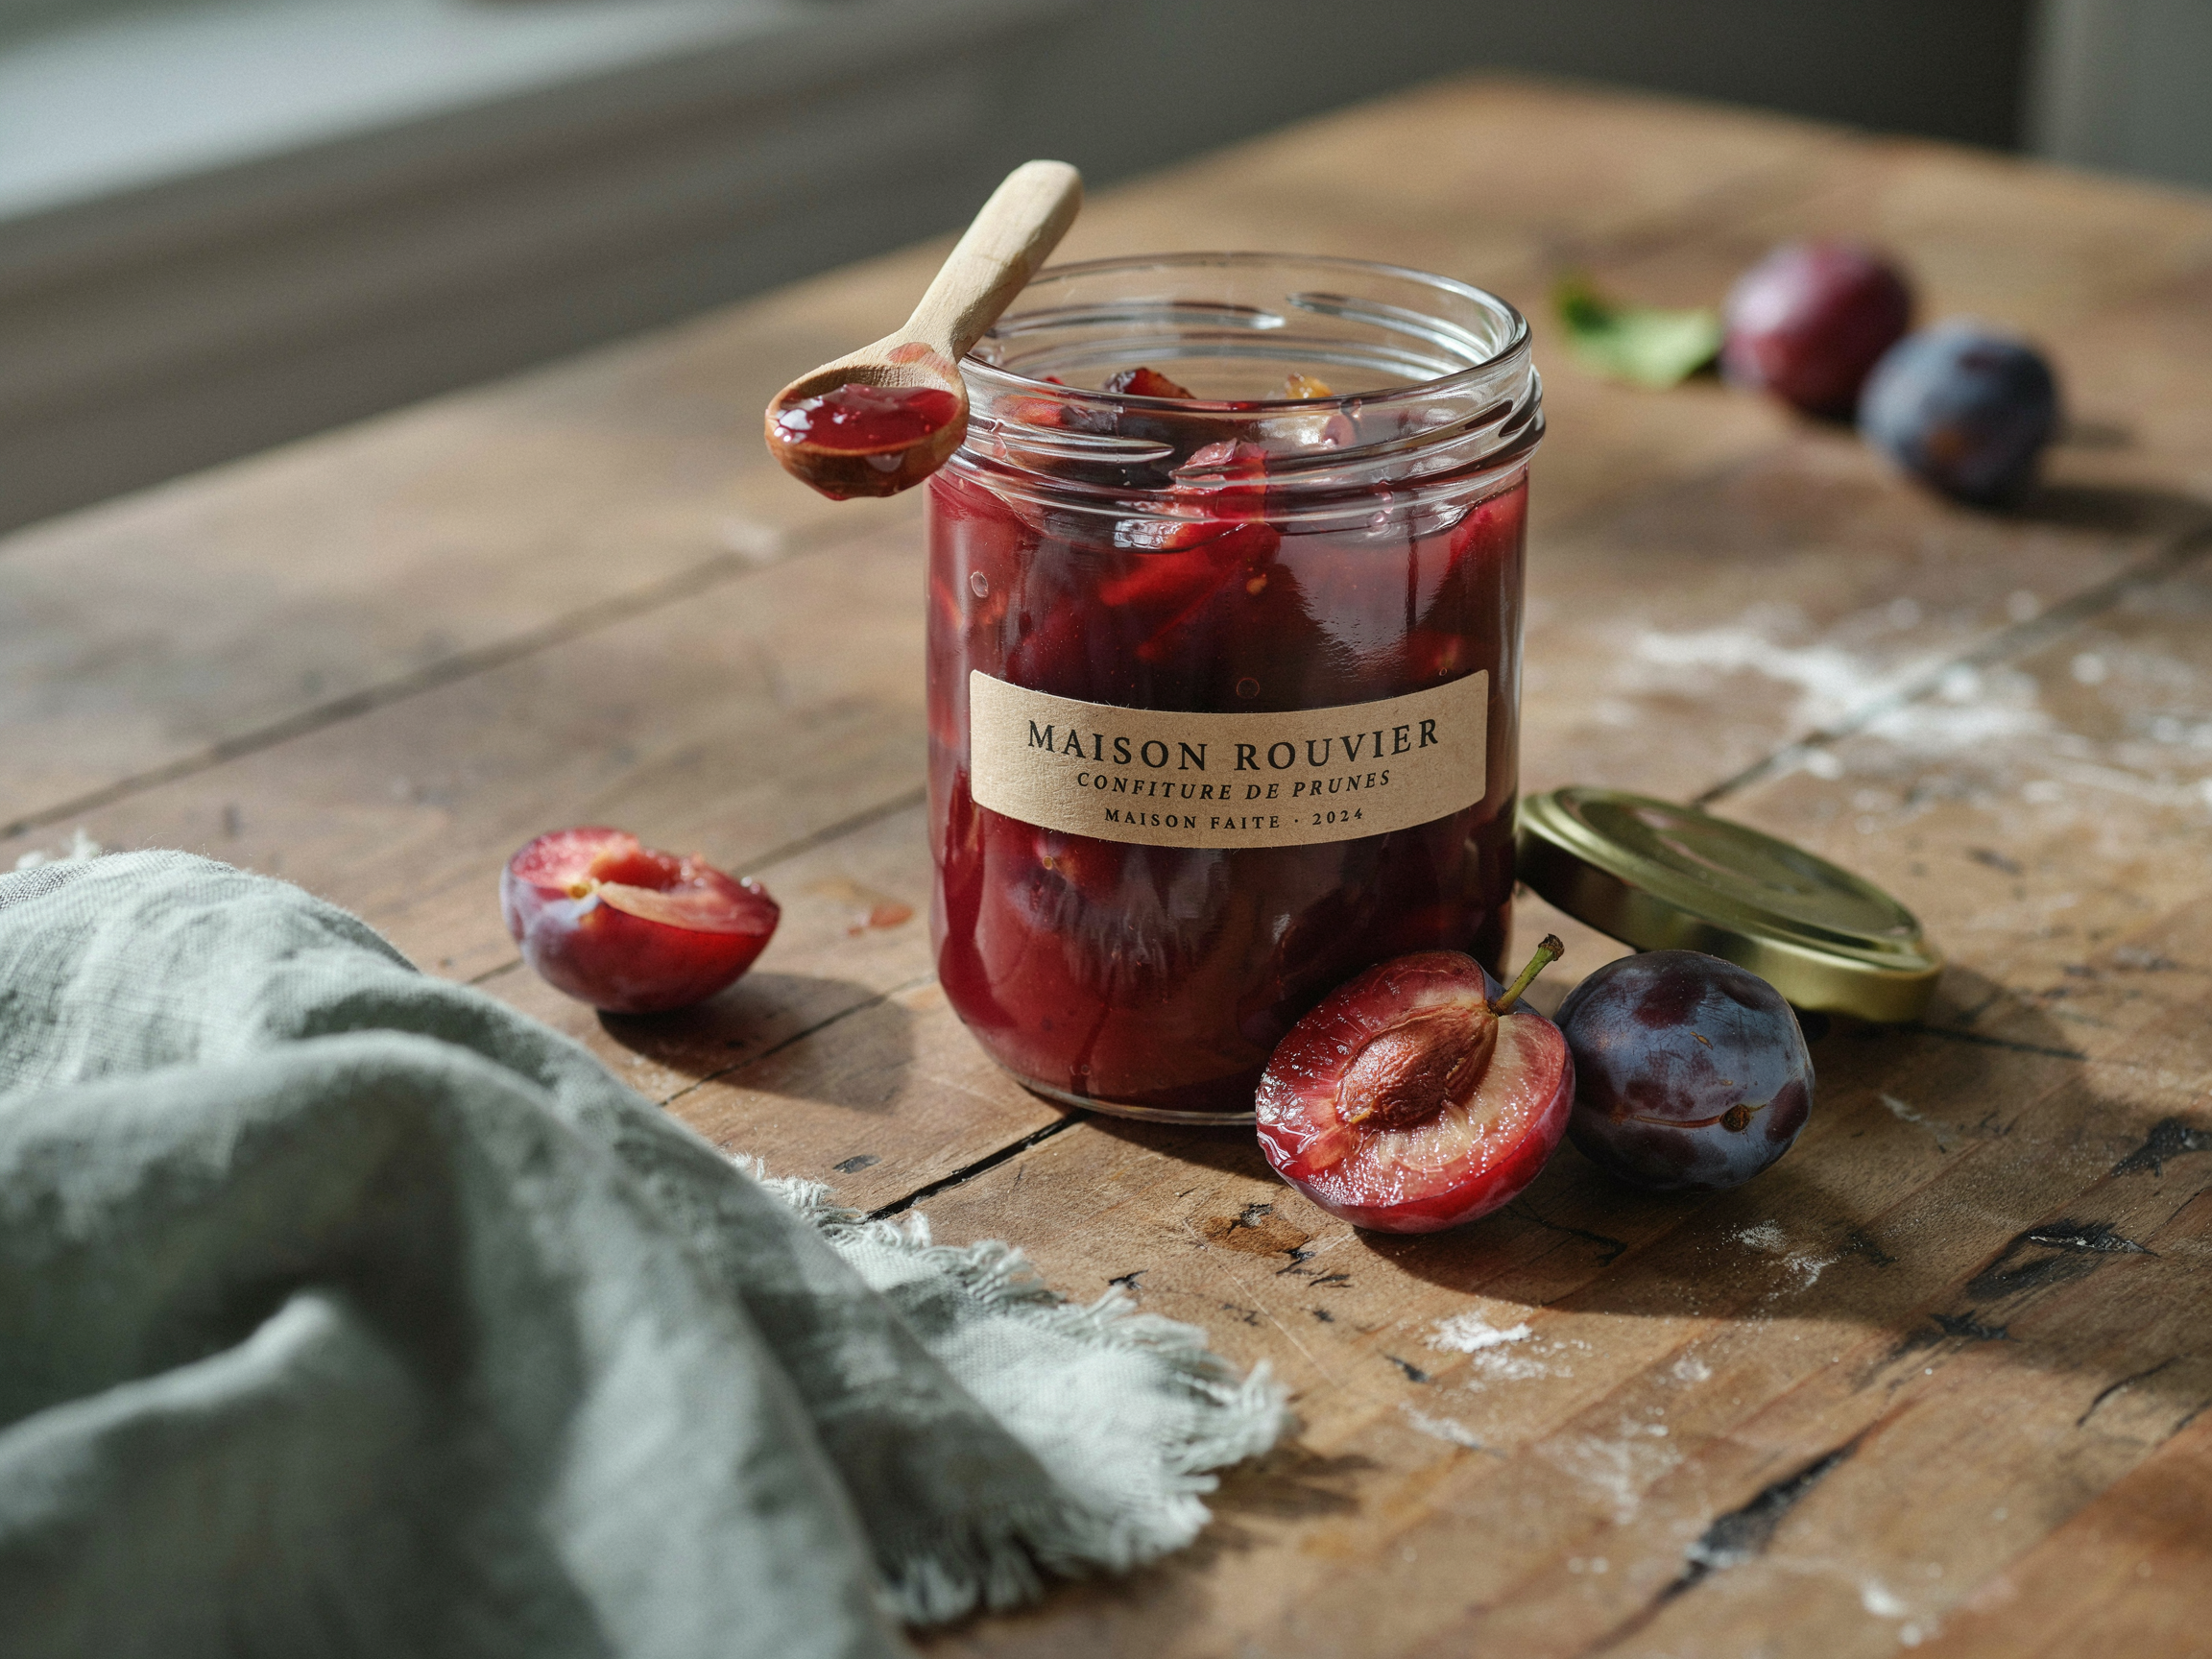
When you’ve got an overactive plum tree or went a little nuts at the farmers market, the answer is jam. This homemade plum jam keeps the fruit chunky and fresh-tasting, with a fruit-forward flavor that beats anything from the store. The first time I made jam, I dumped the plums and sugar in the pot and started cooking right away, and it took forever to break down and tasted overcooked. Macerating the plums overnight first is the trick that changed everything.
What I love is how fresh it tastes. By drawing out the juices ahead of time and cooking it quick in a wide pan, the jam keeps that bright, original plum character instead of tasting like it’s been simmered to death. Keeping the plums chunky, with maybe half run through a food mill, gives you a satisfying mix of smoothness and juicy plum pieces in every bite.
Here’s the kitchen tip that matters most. Start with super-ripe plums, the riper the better. It’s better to have plums on the verge of decaying than ones that are too firm. The best ones hang like water balloons and fall off at the merest touch, or have already dropped to the ground. At the market, ask if the farmer has overripe crates under the table, since you can usually get a discount. Riper plums mean sweeter, more flavorful jam with less added sugar.
And macerate the plums overnight, which is the step that makes the whole thing easier. Toss the quartered plums with the sugar and pectin, cover, and refrigerate overnight so the sugar draws out the flavorful juices and dissolves. The next day it’ll look nice and soupy, and the jam cooks faster with a fresher, less-cooked flavor. Cook it in a wide pan too, so the water evaporates quickly. You’ll smell that bright plum thing fill the kitchen. Use a frozen spoon to test it, and it’s done when it’s spreadable but not runny.
Why You’ll Love This Recipe
It tastes fresh and fruit-forward. Macerating and quick-cooking keep the bright, original plum flavor.
The texture is satisfying. Chunky plum pieces with some milled smoothness in every bite.
It uses up a plum glut. The perfect way to deal with an overactive tree or a market haul.
It’s low in sugar. A pectin that gels without much sugar keeps it from getting cloying.
Ingredients
Here’s everything you’ll need:
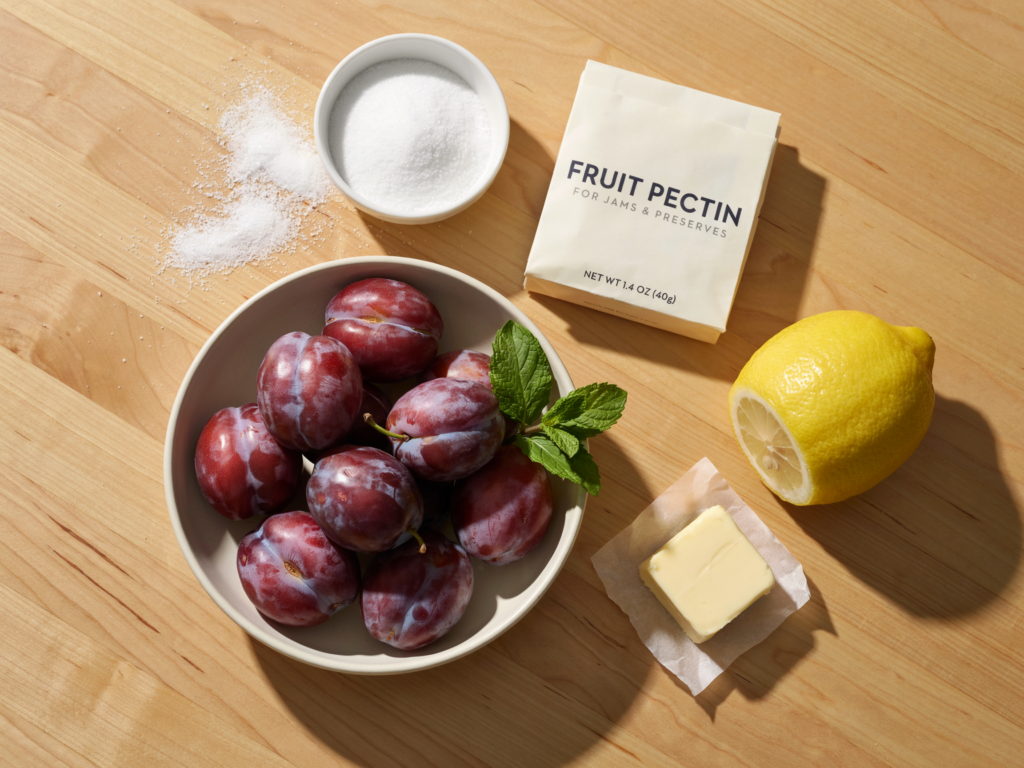
- 4 pounds pitted black or elephant heart plums, unpeeled, quartered
- 1 1/2 pounds granulated sugar
- 1 tablespoon Pomona’s Universal Pectin (optional)
- 4 teaspoons calcium water (optional, per pectin package)
- 2 1/2 ounces bottled lemon juice (for canning; skip for fridge jam)
- 1 teaspoon unsalted butter
How to Make Plum Jam
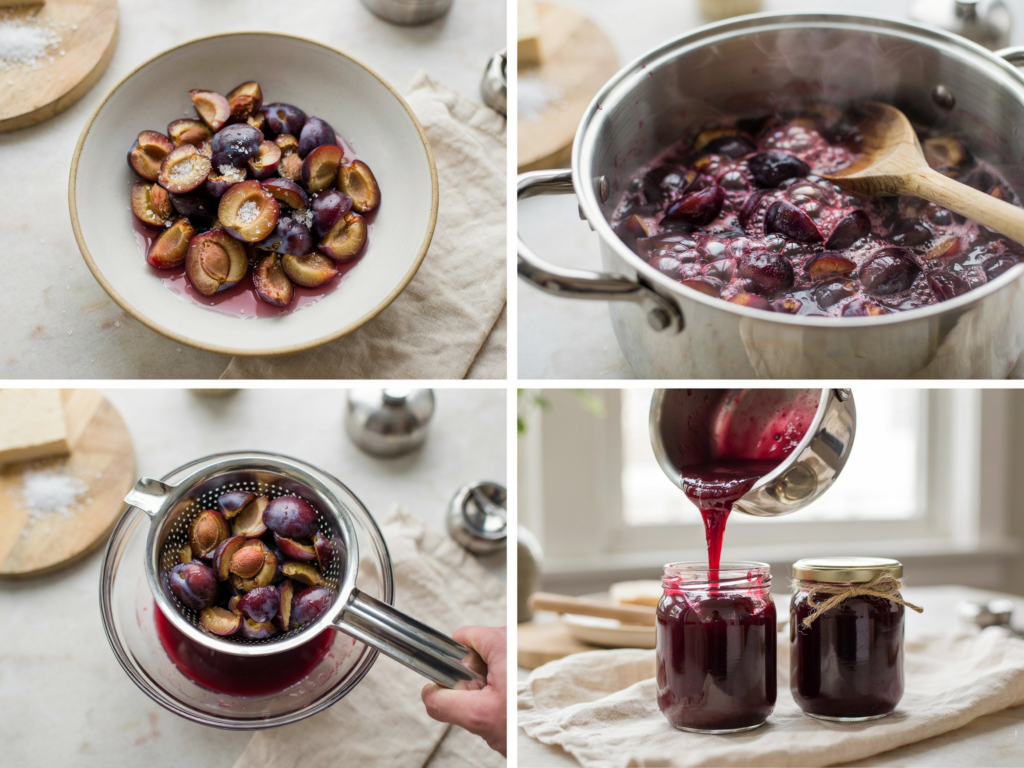
1. Pit and Quarter
Pit and quarter the plums, keeping the skins on since much of the aroma lives there. Five pounds of plums yields about four pounds of flesh once trimmed.
2. Macerate Overnight
Toss the plums with the sugar and pectin in a large bowl, cover, and refrigerate at least 8 hours or overnight. The sugar draws out the juices for a fresher jam.
3. Freeze Spoons and Start Cooking
Put a few metal spoons in the freezer to test doneness later. Transfer the plum mixture to a wide pot, stir in the calcium water, and cook over medium heat, stirring to prevent scorching.
4. Mill the Plums
Once the plums soften, about 15 minutes, run about half through a food mill for a smoother texture, then stir the milled plums back into the pot.
5. Cook and Skim
Keep cooking, skimming off the foam for a glossy jam. Stir in the butter to reduce foaming, plus the bottled lemon juice if you’re canning. Cook until thick and glossy.
6. Test for Doneness
Spoon a little jam onto a frozen spoon and return it to the freezer for 5 minutes. It’s ready when it’s spreadable but not runny.
Expert Tips
Start with super-ripe plums. The riper the better, since they’re sweeter and more flavorful.
Macerate overnight. Drawing out the juices first gives a faster cook and fresher flavor.
Use a wide pan. More surface area means faster evaporation and a fresher-tasting jam.
Skip the lemon for fridge jam. Even a little distracts from the fresh plum flavor, so only add it for canning.
Use a frozen spoon to test. A dab that’s spreadable but not runny means the jam is done.
Recipe Variations and Add-ins
You can keep the jam chunky by milling less, or smoother by milling more.
Use a different plum variety, since any ripe plums work well.
You can add a cinnamon stick or star anise while cooking for a spiced jam.
Add the lemon juice if you plan to can it for shelf-stable storage.
You can skip the pectin for a looser, more saucy jam, cooking it down longer.
What to Serve With This Recipe
Spread it on toast or scones. The jam adds bright plum flavor. It makes a great breakfast.
Spoon it over yogurt or oatmeal. The fruit sweetens the bowl. The two pair well.
Serve it on a cheese board. The jam pairs with cheese and crackers. It rounds out a board.
How to Store This Recipe
For refrigerator jam, just place the lids on the jars, screw on the rings, and let them cool completely before refrigerating. It keeps in the fridge for a couple of months.
To make it shelf-stable, process the filled jars in a boiling water bath for 10 minutes, then let them cool undisturbed. A proper seal will ping as the lid buttons depress, and processed jam keeps in a cool, dark place for up to a year.


Leave a Comment